Curious to see my craftroom.......


Since we moved last year to our first home, I'm the proud owner of my own space, a craftroom. The room feels nice and has a lot of storage space. I can really say it's a little bit like a shop. So now I want to show you guys where I make my projects.


We bought these cabinets at IKEA. I love them, because of all the storage possibilities.


This is my desk.
 
 
With my toolboard above.


And a little warderobe and book shelves.


Fabric bow

 
What you will need;
 
10 inch x 5 inch piece of fabric
2 inch x 4 inch piece of fabric
sewingmachine or hand stitch
pins
safety pin
needle and thread
scissors


Pin good sides of the fabric, lenghts wise, together.

 
I used a lockmachine, so the edged are also immediately finished. Use a safetypin to attach to one side and pull through to the other side, so the good side of the fabric will appear.


Sew both ends together and turn the good side towards you.

 
This is what the back looks like now.

 
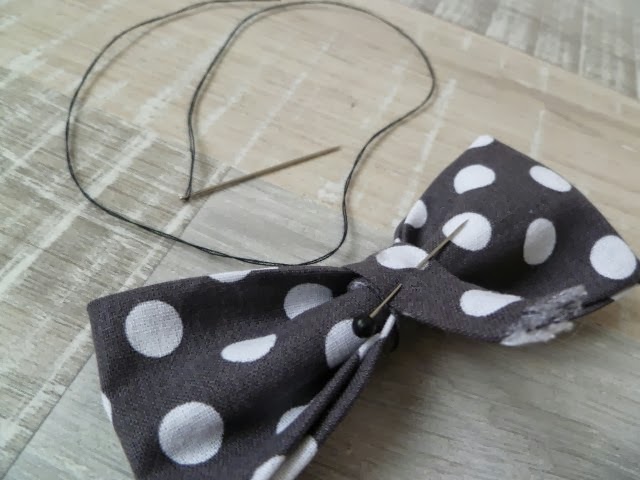
Squeeze the middle together.

 
Take the smaller piece of fabric and place the beginning on the back of the bow in between the fold. Attach with a couple of stitches.


Turn the piece of fabric all around the middle, secure with a pin and cut off the excess. Fold the end inside and finish the bow by firmly stitching it.When the bow is ready you can attach it to different kind of objects. Think about a hair bow, headband, shoes, a bag, t-shirt, etc........

Easy wreath making

 
It can be easy to make a nice, lovely wreath. You need some embellishments. I choose pink  flowers, wooden hearts, wich I spray painted in old grey, a cane heart for in the middle and some ribbon for the top. First thing I did was painting the wreath in old white. While that was drying I sorted out my embellishments, placed everything on the table, including my glue gun. I tried different lay outs and choose the best. Then start gluing! Of course you can make al kinds of wreath in all kinds of themes. Halloween, fall, easter, Christmas, etc.

DIY frame with memories


I bought a beautiful frame at the thrift shop. Removed the painting, gave the frame a washing with a rag, water and white paint and sanded the edges. 


I painted the inside of the frame with grey. Used a hammer and pointed,sharp tool to make the holes on the inside. 


For the hanging system I used screws with eye, transparent wire and beads to lock the wire.


This is how I attached it.


We put the frame above the dinertable and choose to hang our cards that we got to bless us with our pregnancy.

mirror


We bought a pinewood mirror at the thrift shop. I saw it and immediately knew I could give it a fresh, new look. See pictures and instructions below how I did it.
 
 
First we sanded the back.

 
We taped the mirror with papers and tape.

 
We sanded the frame and made it dust free after that.

 
I used chalk paint, old white, in combiantion with water and an old rag. Just spread the paint with the rag and your fingers.


This is how it looks like after 2 layers.

 
Remove the taped papers from the mirror. Cut a potato in half and clean the mirror, rince it with some water and scrub it with a paper untill dry.


Take a staple gun and put a thin wooden panel at the back.


And now it's hanging in our hallway.

Related Posts Plugin for WordPress, Blogger...